Tuesday, January 31, 2012

February Cheese Challenge - Working with Rennet

Last month we used simple ingredients that were readily available to just about anyone. We made cheese using acid, which generally lends itself to drier cheeses that don't readily melt. This month we're going to work with acid and rennet. This month we'll be making 30-minute mozzarella. This is a fun cheese to make and it really does only take 30 minutes.With the whey we'll then make some whey ricotta.

Rennet is made up of enzymes that coagulate the milk proteins. Before the laboratories of today, cheesemakers would slaughter a calf or kid, salt and dry the stomach and then would break off a bit of it when it was needed. They would soak this bit of stomach in some water and then add the water to their milk. I've heard one story that cheese was first discovered when a nomad carried milk in a calf stomach which coagulated milk.

The ancient Romans used an extract from the fig tree to coagulate milk. Several other plants contain the enzymes needed for curdling milk including stinging nettle, our lady's bedstraw, thistle flowers, and butterwort. Vegetable rennet is currently available for use if you don't want to use animal rennet, however aging a cheese made with vegetable rennet can become bitter.

Don't worry if the rennet tablet doesn't completely dissolve
Junket rennet is a popular type of rennet and is more readily found in grocery stores. Unfortunately Junket is much too weak to use for cheesemaking. The rennet used for making cheese is four to five times stronger than the Junket rennet. 

So you can find animal and vegetable rennet. You can also find it in liquid and tablet form. Either form you will need to dilute before adding it to the milk so as to get a consistent curdle. When diluting the rennet you must use unchlorinated water. Chlorine, which is a very common additive in tap water, destroys the ability of the rennet to curdle milk. Use bottled or distilled water.

The milk has set correctly if you can cut it with a knife
Rennet needs an acid to work. For most cheeses a culture is added to the milk to sour it. We won't be working with cultures yet, so instead we'll be using citric acid. Citric acid is made from corn so if you don't want to use a GMO product make sure you use an organic citric acid or one that is labeled Non-GMO. The citric acid sold at the New England Cheesemaking Company is Non-GMO. You can also purchase their 30-minute mozzarella kit which has enough ingredients to make thirty 1lb batches of mozzarella.

You can use just about any type of milk for this EXCEPT Ultra-Pasteurized. The high temps used when ultra-pasteurizing milk destroys the proteins and you'll end up with ricotta instead of mozzarella.

With a long knife, cut the curd
In addition to the three ingredients you will need some equipment. You'll need two large pots, a bowl of ice water, a thermometer, rubber gloves, two small bowls to dissolve the citric acid and the rennet in the non-chlorinated water, a colander and cheese cloth.

Now that you've got your rennet, citric acid and milk together and you have all your equipment let's make some cheese! 

1. Dissolve 1-1/2 tsp citric acid in a 1/4 cup unchlorinated water.
2. Dissolve 1/4 tablet of rennet or 4 drops of liquid rennet in 1/4 cup unchlorinated water.
Draining the whey from the curds
3. Add the citric acid to 1 gallon of milk while stirring. Slowly heat the milk to 90 deg. F. Once there quickly stir in the rennet solution. Don't stir too much or the resulting curd will be grainy. Just a quick couple of stirs. Cover and let sit for 5 minutes.
4. After 5 minutes check to see if the curd easily separates. If it doesn't wait a few more minutes.
5. Cut the curd into 1" squares.
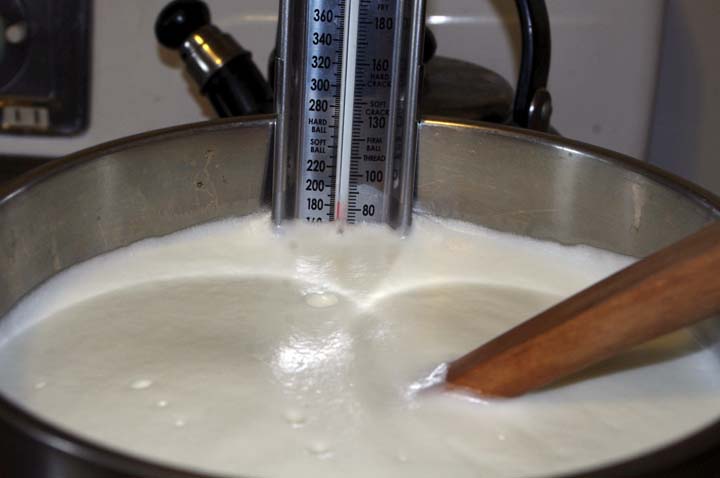
6. Slowly heat the curds up to 105 deg F while gently stirring them.
7. Once they've come up to temperature ladle the curds into a colander lined with cheesecloth and allow the curds to drain. Save the whey though! We want to make ricotta from it.
8. Transfer curds into a microwave safe bowl and heat in the microwave for 1 minute. Drain the whey off. You'll want to wear gloves now because the curds will be really hot.
9. Add and knead in 1 tsp salt or herbs to taste and microwave for another 30 seconds.
10. Now comes the fun part of stretching the mozzarella. Stretch it and stretch it some more. Kind of like taffy.
11. The more you stretch it the firmer the final product will be. I like to stretch it for quite awhile so that it is easier to slice when it's cooled off.
12. Once you're happy with the consistency you want to make it into a ball (or several if you wish) and immediately drop them into a bowl of ice water to cool the cheese off as quickly as possible. A slow cooling will leave you with a grainy texture so this step is a must if you want a nice smooth mozzarella.
13. Of course, now that it's cooled you'll want to slice a bit off to taste! Go ahead and enjoy it. Let us know what you end up doing with it.

We ended up using ours to top a lasagna and also a potato casserole I made later in the week. For the lasagna I also needed ricotta cheese. So this is how I made that.

Now that you have all the leftover whey heat it up until it's simmering on the stove. You'll notice that the appearance of the whey changes and there are little white things floating around the yellow liquid. This is your ricotta!

Turn the heat off and simply strain through butter muslin (or sometimes I like to use coffee filters). I usually have to strain the ricotta overnight to get the desired consistency that I like. Once it's done straining add salt to taste and you're all done! You now have two cheeses from one gallon of milk!

Sunday, January 29, 2012

Getting a Head Start on Summer with Limoncello

There isn't quite anything like sipping on ice cold limoncello after dinner with good friends on a hot summer night. It does take time to make so you'll need to start now to have a good batch of it ready to go for those summer nights. Limoncello used to be hard to find but is gaining in popularity, however the good stuff is never cheap. You can easily make it at home and it tastes so much better. It's great to start now when you are probably drowning in extra lemons that you don't know what to do with. I prefer to use Lisbon or Eureka lemons over Meyer lemons. The Meyer's just don't offer the real lemony taste that I feel this drink calls for. Plus you would need about double the amount of Meyer's as they tend to be much smaller. The longer you let the mixture sit, the flavor will intensify but the alcoholic "zing" will mellow. I like to go about 20 days on each rest period to allow it to mellow while also having some intensity.  

Ingredients
  • 18 Lisbon or Eureka lemons, washed and dried
  • 2 750mL bottles of 100 proof vodka (I prefer Stolichnaya)
  • 5 cups of water
  • 4 1/2 cups raw sugar
  Instructions
1. Avoiding the pith (white part of the peel) remove the lemon zest with a sharp knife or zester into a large glass or ceramic pitcher.
2. Pour one 750mL bottle of vodka over the zest, cover tightly and store in a cool dark place for 15-30 days.
3. In a saucepan combine water and sugar and heat until sugar is completely dissolved. Allow to cool.
4. Add syrup and remaining vodka to the lemon zest and vodka mixture. Cover and let sit again in a cool dark place for 14-30 days.
5. Strain mixture into glass bottles and store in a cool dark place or give away as gifts.
6. Refrigerate before serving or pour over ice. A little goes a long way so I recommend serving it in cordial glasses.

Sunday, January 22, 2012

Tom's Spicy Tomato Sauce


On Our first date Tom made me dinner at his apartment. It was a simple yet tasty dinner but I was most impressed that not only that he could cook but also that he enjoyed it. One of his best dishes was spaghetti sauce from scratch. Everyone who ever tries it raves about it.


Over time his recipe has improved. Fresh herbs and homemade sauce from our garden replaced the commercial sauce and dried herbs. The season really depends on all that we put in it. During the winter we don't have peppers, zucchini, or eggplant available. So instead we just add more onions and mushrooms.


 The secret ingredients in this sauce are the hot sauce and the sugar. Tom didn't really want me to share, but then why would you make this recipe if it was just so-so? The hot sauce adds some heat along with some extra acid. We generally like to use Tapatio. I think Tabasco would be too vinegary for this sauce though.


  • 4 c tomato sauce
  • 1 c tomato paste
  • 1/4 c red wine
  • 1 c water
  • 1lb sausage, removed from casings or ground meat
  • 1 onion, chopped
  • 3 cloves garlic, minced
  • 1 zucchini, cut in half and sliced
  • 8 oz mushrooms, sliced
  • 1 small eggplant roughly chopped
  • 1 bell pepper chopped
  • 2 Tbs Olive Oil
  • 2 Tbs Hot Sauce
  • 2 Tbs chopped fresh basil
  • 1 Tbs chopped fresh rosemary
  • 1 Tbs chopped fresh Thyme
  • 1 Tbs chopped fresh Oregano
  • 1 Tbs sugar
  • Salt and Pepper to taste
1. In a hot dutch oven over medium high heat add oil and then sausage. Break up sausage while it cooks. Add garlic, herbs and hot sauce and continue cooking until sausage is browned.
2. Deglaze with the red wine.
3. Add the remaining ingredients and bring to a boil. Reduce to a simmer and cook until vegetable are tender and the sauce has thickened.
4. Serve over fresh pasta or add to a lasagna (I've been known to eat it on it's own).

Thursday, January 19, 2012

Update on our Second Year

We're well into our second year without grocery stores. Things are going pretty well, so well in fact that I still have absolutely no desire to step foot again in a grocery store. Being able to go to restaurants once a month is definitely helps though. It gives us a little bit of a break from having to cook all the time.

For the garden we've decided to switch things up a bit. We don't have much growing right now so we've decided to split the garden in half to maximize our fall harvest. One half will be for Spring crops and then the second half will be Summer crops. Then the side that was for Spring crops will become Fall crops. Next year the Summer crop area will be Spring crops and the Fall area will then become Summer crops. It does mean we'll have less to harvest during the Summer, but definitely will provide us with more food in the fall and winter. All of our seeds for the coming year so far have cost us about $120. I'm sure I'll be ordering more - I always do because we always end up with some failure that I have to replace.

Another thing I've noticed is that we're still spending a lot less money on our food. Even less than we were during the first year. Now that we're in the swing of things I'm finding we're only really going to the farmers' market and I'm not ordering from the buying club every month. I'm also going to be cancelling our CSA due to some issues I'm having with their billing practices. We were mostly just getting dairy items from them.With the goats producing 1-2 quarts a day of milk there are just a few things we need like cream and butter and that's not that often. I have another non-grocery store source where I can get those so I'm just going to cancel the CSA.

Right now we're probably only spending an average of $50/week on food, which is pretty minimal, especially considering our garden isn't really giving us anything. I'm feeling really good where we're at so on we will continue.


Sunday, January 15, 2012

Lemon Souffle Revisited- with Limes

Awhile ago I posted a Lemon Souffle recipe on my other blog that I thought at the time was pretty good. But everything around here is constantly evolving, even my go-to recipes. When I was a kid my mom used to make lemon souffle as a very special treat. We didn't get it very often, but I always remember it being one of my favorite dishes. It was sweet and extra tangy. She used to make it in one big casserole dish rather than in ramekins, but that was OK with me!

This recipe can work for either but you'll have to adjust the time for large dishes. I'm famous in my family for my lemon meringue pie. I'm pretty secretive about my recipe (even my recipe card just has the ingredients on it and none of the instructions) but I'll tell you that some of my secrets to it are super fresh, backyard eggs and Lisbon or Eureka lemons. Meyer lemons just don't work because they are too sweet. I started with my lemon meringue pie recipe and adapted it to become a lemon souffle since I never did get my mom's recipe for her souffle. For this recipe you can use either lemons or limes. Since I don't have any lemons on hand yet this year, I made it with limes instead. Of course, you can also do oranges or other citrus, you'll just need to adjust the water and sugar to your taste.  

Lemon/Lime Souffle
4 eggs, separated
1 cup sugar plus extra
1/2 cup water
1/2 cup lemon and/or lime juice
2 Tbs corn starch
1 Tbs whole milk (we use goat's milk)
1/8 tsp cream of tartar
Butter

1. Preheat oven to 400 deg F.
2. Using the butter, grease 4 ramekins and then coat with sugar.
3. Begin beating egg whites and add cream of tartar. Beat until stiff.
4. Mix remaining ingredients together, beating until smooth.
5. Fold in egg whites and pour into ramekins.
6. Bake for 15 min. or until the tops are puffy and golden brown.
7. Serve immediately.

Monday, January 2, 2012

Pumpkin Maple Scones


Most mornings involve a cup of home-roasted coffeewith a bit of sugar and some goat milk and a steaming hot bowl of oatmeal that's been cooked in goat milk. It's creamy and doesn't need much brown sugar. A touch of cinnamon makes it even better. On the weekends we always do at least one morning differently. While I love the oatmeal, it does get repetitive after awhile and I do like a change.

Those mornings we sometimes make pancakes or waffles. When I'm feeling extra industrious I'll make bagels or English muffins for eggs benedict. If we have bacon or sausage in the fridge we make biscuits and gravy. Sometimes I don't have as much time or energy though so I go with something a bit easier. Scones fit this bill. Unlike bagels and English muffins, they don't have to rise.


Scones traditionally have a lot of butter, which is a treasured commodity for us so I didn't really want to give up a stick for one breakfast. Cooked pumpkin, or winter squash is a good substitute for oils like butter. It's also a good way to make a substitute if you want to eat a bit healthier. We have plenty of winter squash that we really need to use up so I went out to our storage area and grabbed a small one to bake. I simply cut the squash in half and scooped out the seeds. I put the squash cut face down in a baking dish and put a thin layer of water on the bottom. I put it in a 400 deg F oven until the squash was fork tender. The time will vary depending on the size and type of the squash.


Preheat oven to 425 deg. F 
Sift together: 
2 1/2 cups flour 
2 1/4 tsp baking powder 
1/2 tsp salt 
1 tsp cinnamon 
1 tsp ground ginger 
1/2 tsp ground allspice 
pinch of ground cloves 

Make a well in the center of the dry ingredients and add: 
1 Tbs maple syrup plus more 
1/2 cup cooked pumpkin 
2 eggs
1/4 cup milk 

In a circular motion blend the wet ingredients into the dry ingredients with a fork. If it gets too tough to mix you can use your hands to combine. The dough should be pliable. I use medium eggs so if you're using large eggs you'll end up with a wetter dough. Add a bit more flour if the dough is sticky. I decided to make small scones so I divided the dough in half. Pat the dough into a ball and then on a well floured surface roll it out to 3/4" thick. You'll want it to be circular to make it easier to cut evenly shaped scones. One disc should make 8 scones. Place them on a parchment lined cookie sheet and brush them with maple syrup. Bake for 15 minutes or until lightly browned. 

These won't have the crumbly texture or be as dense as you're used to scones having probably because of the lack of butter. They are chewy and filling though and taste great plain or with just a bit of butter.  

Sunday, January 1, 2012

January Cheese Challenge - Nothing but Curdled Milk

It's our very first cheese challenge! Are you ready? This won't be too difficult to do. We're going to start with a simple cheese that only uses ingredients that you can find easily or may already have in your kitchen. There are several different types of cheese you can make here. I'll show how I make one of them but you can choose to make that one, one of the others or all of them if you want. Feel free to get creative by adding herbs and spices.

All of these cheeses use an acid to curdle the milk. There is no need to add cultures to make these cheeses.

Paneer is a traditional Indian cheese made with whole milk, lemon juice or vinegar.

Ricotta, which is traditionally made from the whey left over from making hard cheeses, can also be made with whole milk. Again, you use vinegar or lemon juice to curdle the milk.

Yogurt Cheese is simply that - cheese made from yogurt. It's also called Lebanah and is common in the Middle East and Greece. You simply strain plain yogurt until you create a cheese from it. The resulting whey I suspect you can make traditional ricotta from because the yogurt is cultured. By making traditional ricotta simply heat up the whey to near boiling. You'll see tiny specks develop which is the albumin protein separating out. This is what makes up the ricotta. Simply strain the whey again and you'll have a small amount of ricotta.

Buttermilk cheese can be made with whole milk, some cultured buttermilk and salt.

The recipe I've decided to take on is Queso Blanco, a spanish unaged white cheese that is traditionally made with cow milk. I don't have any cow milk, so goat milk it will be.

For this recipe I'll be using 1 gallon of raw goat milk, distilled white vinegar and kosher salt. This recipe doesn't require the milk to be raw because I will be heating it to a high temperature, which will basically pasteurize it anyways.

I started by heating up the milk to 185 deg F.You can bring it to boiling, but this imparts a cooked flavor to the milk which I would prefer to avoid.

Once it reaches 185 deg F I took it off the heat and stirred in 1/4 cup of vinegar (you can add an additional 1/4 cup slowly if you don't have curds yet). I slowly stirred until curds began to form. They are white masses and the whey that separates out will have a yellow color to it. I then allowed it to sit for 5 minutes to allow them to develop more and settle a bit.


I then strained the curds and whey through a cheesecloth lined colander over another pot. We save the whey and freeze it in ice cube trays to add to smoothies. I allowed the cheese to drain for 10 minutes. I then put the curds in a bowl and mixed in 1 Tbs of kosher salt. I took the cheesecloth, lined a cheese basket (mine came with the hard cheese kit I previously purchased from here) and put the curds in it. I gently pressed out a bit more whey and then put it in the fridge to chill. Once chilled I gently pulled it out and put the cheese on a plate.


We used some of this cheese our our pizza. This type of cheese doesn't melt. Also, it doesn't improve with age so it must be eaten fresh. If you can't eat it all fresh, you can freeze it, but the texture may change a bit.

So, your challenge is to choose one of the cheeses above to make. Feel free to build on the recipe by adding herbs and spices. Try new milks if you can find them, like sheep or goat. Then tell us what you did and how you used it.

I look forward to hearing how it goes!