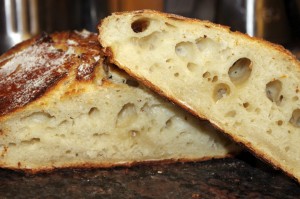
 San Francisco is famous for their sourdough bread which runs wild around there. Fortunately we can all catch our own wild sourdough starter, which is also called levain. Levain is the French term for sourdough starter and has been used for centuries to make bread. Bread made with Levain may even be healthier for you than breads made with commercial yeast. Sourdough actually has a lower glycemic index than regular bread. The levain also breaks down phytic acid in grains. Phytic acid blocks the absorption of minerals and vitamins. Levain also shows promise for people that are intolerant of gluten because it helps degrade and deactivate the proteins that adversely affect people.
Nowadays you can purchase commercial sourdough starter, but what fun is that? Plus you can't boast that you actually caught the wild levain that made your bread. The bonus is that it's super easy to do and doesn't take much, but you don't have to tell others that. Go ahead and let them think it took you days of complicated procedures to obtain.
So are you ready to get blown away? To catch a levain all you need is some flour and an equal amount of water in a wide mouth container or bowl. Yep, that's pretty much all you need. And all you do is mix the flour and water together and set it outside for a couple of days. Bring it in, keep it in a relatively warm spot and once it starts to form bubbles on the surface you can go ahead and store it in the fridge. The only thing you do need to do is occasionally feed it equal parts of flour and water once a day. It should have a slightly sour smell to it, which is a good thing. You can keep your levain going for as long as you're willing to take care of it, or if something goes wrong like it gets moldy.
 So how do you use your levain? I like to make a nice no-knead artisan bread with it. The following recipe makes two loaves or one really big one if you're up for it. However, for a larger loaf the baking times will be longer.
In a large bowl mix together 3 cups warm water (about 110 deg F), 1-1/2 Tbs kosher salt and 1/2 cup of your levain. Add 7-1/2 cups flour and mix. It should be a wet dough, but not sloppy. When you measure the flour you want it to be level cups, which you can get by using the flat back edge of a knife to scrape excess flour off evenly. Cover and allow this to sit for at least two hours in a warm, dark spot.
This dough will not rise like breads made with commercial yeast so don't worry too much. After two hours you can put it in the fridge to store or make a loaf right away. The dough, because it's wet, is much easier to handle when it's cold though, so I usually put it in the fridge for about 2 hours before I plant to bake it.
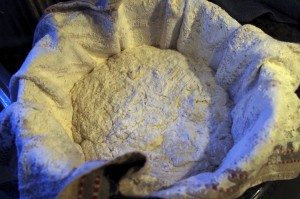
When I'm ready I pull out half of the dough and while working quickly I shape it into a ball by pulling the top down over the sides stretching it. I then place this ball in a bowl that is lined with a heavily floured non-terry cloth towel. Sprinkle a bit of flour on top and then cover with the edges of the towel.
Allow it to rest and do a bit more rising for an hour. 40 minutes into the rise place a dutch oven (cast iron of course works the best, but you can use any type as long as it has a lid) in your oven and preheat to 450 deg F. The purpose of the dutch oven is to steam the bread for the first part of the baking. This helps develop a moist crumb while allowing for that real crunchy crust. Of course the heavier the lid the more steaming action you're going to get, which will further help develop larger holes in the crumb.
 When you're ready to bake pull out the dutch oven and remove the lid. Pick up the towel and bread and quickly (and this can take some practice) and gently roll the dough out of the towel into the hot dutch oven. Quickly put the lid on and put it back in the oven.
Bake with the lid on for 30 minutes then remove the lid and bake for an additional 30 minutes or until the crust is completely browned. Don't overcook though as the bottom can and will burn if left too long.
When you're ready to bake pull out the dutch oven and remove the lid. Pick up the towel and bread and quickly (and this can take some practice) and gently roll the dough out of the towel into the hot dutch oven. Quickly put the lid on and put it back in the oven.
Bake with the lid on for 30 minutes then remove the lid and bake for an additional 30 minutes or until the crust is completely browned. Don't overcook though as the bottom can and will burn if left too long.Remove the bread from the dutch oven and place on a cooling rack. Allow to cool until you can handle it and then serve. You have now mastered the no-knead artisan bread.
A note about ovens and not getting the perfect loaf. Every time I did this recipe it came out well, but not as good as I knew it could be. I always thought I was doing something wrong. When we got our Wedgewood I quickly realized that not all ovens are created equal. Our previous, cheapo oven just couldn't do the job and it had made me feel inadequate. So if you have a hard time making that perfect loaf of bread it may not be your fault at all, but rather the oven that you are using.
How do you keep bugs and other things from getting into the mixture while you have it outside?
ReplyDeleteyou can put some cheese cloth over the top. I personally have had much of an issue with bugs though.
ReplyDeleteGreat recipe. People think making sourdough is so hard, but you just showed them how easy it is. We make wine and beer here so we have plenty of yeast in the house. I never think of telling people to put it outside, though it may be a bit cold here in Wisconsin this time of year. lol Wonderful post. You have so much to share.
ReplyDeleteWOW! I never knew this! I am going to try this asap~
ReplyDeleteAnd you are correct about the oven. Quality is important!
Jennifer
I have made a sourdough starter without store bought yeast before and really liked it.
ReplyDeleteI am a little confused about the feeding it part, you say occasionally feed it equal parts flour and water once a day...so does this need to be done every day or occasionally, and how much volume should it get fed?
ReplyDeleteLacey, once a day every day. I range in feeding it from 1/3 cup of each to 1 cup of each depending on how much starter I currently have and whether I'm keeping it in the fridge or not (fridge slows down the starter so it needs less food).
DeleteOkay, more questions! The first batch I made was wonderful and rose beautifully in the oven, but the last two batches I have made just haven't risen like they are supposed to....they taste fine, but are rather dense. Any recommendations?
DeleteHow are you storing your starter?
DeleteOla somos o Aurora Boreal do Brasil e vinhemos agradecer as visitas.
ReplyDeleteObrigado viu..,continuem com agente,que continuaremos com vcs,vamos divulgas essa matérias lindas lá também certo?]
Obrigado amigos.
http://auroraborealce.blogspot.com/
How do you think this will work for non-gluten flours? We can't eat wheat, but I miss sourdough very much.
ReplyDeleteI honestly don't know much about gluten-free baking, especially how you leaven it. I guess it's worth a try though.
DeleteThis sounds wonderful! And I've been looking for a recipe like this for a long time. Can't wait to try it. But I just can't wrap my mind around the steam thing. Do you put water in the dutch over for steam? If so, how much, and if so, I'm assuming you pour it off before rolling the dough into it. Or does it just create steam by it's presence in the oven? Also, do you grease the dutch oven with something before placing the dough into it? Thanks.
ReplyDeleteNope, you don't have to add anything to dutch oven. No water, no grease. There should be plenty of flour left on your dough before putting in the dutch oven. Then when it cooks it releases steam, which is what is steaming it. Good luck!
Delete